
Introduction to Swiss Chocolate Chalet Cake
If you’re looking for a dessert that captures the essence of indulgence, look no further than the Swiss Chocolate Chalet Cake. This rich, luxurious cake is a celebration of Swiss chocolate, renowned for its smooth texture and deep, velvety flavor. Perfect for any occasion, the Swiss Chocolate Chalet Cake combines the best of Swiss chocolate with a rustic, homey charm that transports you straight to the Swiss Alps.
This cake isn’t just about decadence; it’s also surprisingly easy to make, making it a great choice for both novice bakers and seasoned pros. Whether you’re preparing a show-stopping dessert for a dinner party or simply treating yourself to something special, this recipe will not disappoint. The Swiss Chocolate Chalet Cake is versatile, allowing for various dietary adaptations without sacrificing taste or texture.
In this guide, we’ll explore the steps to create this stunning dessert, discuss its numerous health benefits (yes, chocolate can be healthy.), and provide tips for mastering the art of the Swiss Chocolate Chalet Cake. Get ready to embark on a delicious journey to the heart of Swiss chocolate heaven.
Benefits and Advantages of Swiss Chocolate Chalet Cake
The Swiss Chocolate Chalet Cake isn’t just any chocolate cake—it’s a dessert that brings several unique benefits to the table. To begin with, its use of high-quality Swiss chocolate sets it apart. Swiss chocolate is known for its creamy, smooth consistency and rich flavor profile, thanks to a combination of superior ingredients and meticulous production methods. Consequently, this ensures that every bite of the Swiss Chocolate Chalet Cake is a melt-in-your-mouth experience.
Another key advantage of this cake is its simplicity. Despite its luxurious taste and appearance, the Swiss Chocolate Chalet Cake is surprisingly straightforward to prepare. With a few basic ingredients and easy-to-follow steps, you can create a dessert that looks and tastes like it came from a high-end bakery. This makes it an ideal choice for busy individuals who want to impress without spending hours in the kitchen.
In terms of health benefits, the Swiss Chocolate Chalet Cake has a lot to offer. Dark Swiss chocolate, a core ingredient in this recipe, is rich in antioxidants, which can help reduce inflammation and improve heart health. Additionally, when made with whole grains and natural sweeteners, the cake can be a healthier alternative to traditional desserts. For those following specific dietary plans, this recipe can easily be adapted to be gluten-free, dairy-free, or vegan, making it accessible to a wide audience.
Finally, the Swiss Chocolate Chalet Cake is perfect for a variety of occasions. Its elegant appearance makes it suitable for formal events, while its comforting, rich flavor is equally at home in a casual setting. Whether you’re celebrating a birthday, anniversary, or simply a love of chocolate, this cake is sure to make the moment memorable.
Swiss Chocolate Chalet Cake :Ingredients Overview
Essential Ingredients for Swiss Chocolate Chalet Cake
Creating the perfect Swiss Chocolate Chalet Cake begins with gathering high-quality ingredients. Here’s what you’ll need:
- Swiss Dark Chocolate (70% cocoa or higher): 200g (7 oz)
- Purpose: The star ingredient, providing the deep, rich chocolate flavor and a smooth texture.
- All-Purpose Flour: 1 ½ cups (180g)
- Purpose: Forms the base of the cake, giving it structure.
- Cocoa Powder (unsweetened): ½ cup (50g)
- Purpose: Enhances the chocolate flavor and adds to the cake’s color and richness.
- Baking Powder: 1 ½ tsp
- Purpose: Ensures the cake rises evenly, resulting in a light and fluffy texture.
- Salt: ½ tsp
- Purpose: Balances the sweetness and enhances the overall flavor profile.
- Unsalted Butter: ¾ cup (170g), at room temperature
- Purpose: Adds moisture, richness, and a tender crumb to the cake.
- Granulated Sugar: 1 cup (200g)
- Purpose: Sweetens the cake and helps with browning during baking.
- Eggs: 3 large, at room temperature
- Purpose: Provides structure and helps bind the ingredients together.
- Vanilla Extract: 2 tsp
- Purpose: Adds a subtle, sweet aroma and depth to the cake’s flavor.
- Whole Milk: ¾ cup (180ml)
- Purpose: Moistens the batter and contributes to a tender texture.
Dietary Substitutions to Customize Your Swiss Chocolate Chalet Cake
The beauty of the Swiss Chocolate Chalet Cake lies in its adaptability. Here are some replacements to meet varied dietary needs:
- Gluten-Free Option:
- Replace the all-purpose flour with a 1:1 gluten-free flour blend. Ensure the blend contains xanthan gum or a similar binding agent to maintain the cake’s structure.
- Vegan Option:
- Substitute the butter with a plant-based alternative, such as coconut oil or vegan butter.
- Replace the eggs with flax eggs (1 tbsp ground flaxseed mixed with 3 tbsp water per egg) or a commercial egg replacer.
- Use almond milk or another non-dairy milk in place of whole milk.
- Dairy-Free Option:
- Substitute the butter with a dairy-free alternative like margarine or coconut oil.
- Use a plant-based milk such as oat milk or soy milk instead of whole milk.
- Low-Sugar Option:
- Replace the granulated sugar with a natural sweetener like coconut sugar or a sugar substitute like stevia or erythritol. Be mindful of the conversion ratios if using sugar substitutes.
By making these simple adjustments, you can tailor the Swiss Chocolate Chalet Cake to fit various dietary preferences without compromising on flavor or texture.
How to Prepare the Perfect Swiss Chocolate Chalet Cake: Step-by-Step Guide
Crafting the ideal Swiss Chocolate Chalet Cake requires attention to detail, but the process is straightforward. Follow these instructions to guarantee that your cake comes out flawlessly every time.
First Step: Preheat and Prepare
Start by preheating your oven to 350°F (175°C). This ensures that the oven is at the right temperature when you’re ready to bake, promoting even cooking. Next, prepare your cake pans. Grease two 8-inch round cake pans with butter or non-stick spray, then line the bottoms with parchment paper. This prevents the cake from sticking and makes it easier to remove from the pans once baked.
Second Step: Melt the Swiss Chocolate
Place the Swiss Dark Chocolate in a heatproof bowl over a pot of simmering water (a double boiler). Stir gradually until the chocolate is completely melted and smooth. Alternatively, you can melt the chocolate in the microwave in 30-second intervals, stirring between each interval until smooth. After the chocolate melts, remove it and let it cool somewhat.
Third Step: Combine Dry Ingredients
Sift the all-purpose flour, baking powder, cocoa powder, and salt into a large mixing basin. This step is crucial because sifting helps to remove any lumps and ensures that the dry ingredients are well combined, resulting in a smoother batter.
Fourth Step: Cream the Butter and Sugar
In a separate bowl, use an electric mixer to cream the unsalted butter and granulated sugar together until light and fluffy. This process usually takes about 3-5 minutes on medium speed. The mixture should be pale in color and have a creamy texture, which will help create a light and airy cake.
Fifth Step: Add the Eggs and Vanilla
Beat thoroughly after adding each egg to the butter and sugar mixture. Add the eggs one at a time. This helps to fully incorporate the eggs and prevents the batter from curdling. Once the eggs are fully mixed in, add the vanilla extract and beat until combined.
Sixth Step: Incorporate the Chocolate
Slowly pour the melted Swiss Dark Chocolate into the butter, sugar, and egg mixture. Mix on low speed until the chocolate is fully incorporated, creating a rich, chocolatey batter.
Seventh Step: Alternate Adding Dry Ingredients and Milk
With the mixer on low speed, add one-third of the dry ingredients to the batter, followed by half of the whole milk. Mix until just combined, then repeat with another third of the dry ingredients and the remaining milk. Finally, add the last third of the dry ingredients. Mixing in stages helps to prevent overmixing, which can result in a dense cake. The batter should be smooth and thick but still pourable.
Eighth Step: Pour and Bake
Evenly divide the batter among the cake pans that have been prepared. Use a spatula to spread the batter into an even layer in each pan. Tap the pans gently on the counter to release any air bubbles trapped in the batter.
Place the pans in the preheated oven and bake for 25-30 minutes, or until a toothpick inserted into the center of the cakes comes out clean. The cakes should be set, with a slight spring when touched.
Ninth Step: Cool the Cakes
Once the cakes are done baking, remove them from the oven and allow them to cool in the pans for 10 minutes. After 10 minutes, carefully run a knife around the edges of the pans to loosen the cakes, then invert them onto a wire rack to cool completely. It’s crucial to let the cakes cool fully before frosting to prevent the frosting from melting.
Tenth Step: Frost and Assemble
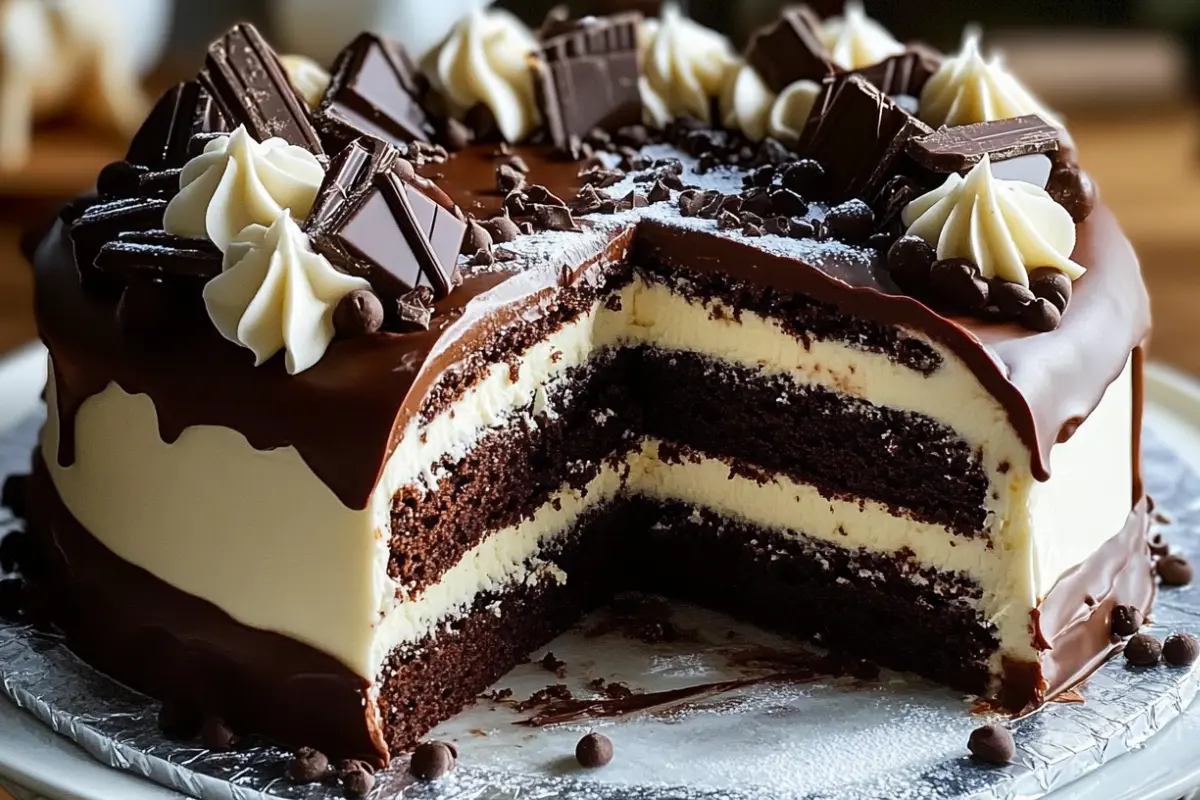
Once the cakes are completely cool, you can begin assembling your Swiss Chocolate Chalet Cake. Prepare your favorite chocolate frosting or ganache. One cake layer should be assembled and placed on a serving dish or cake stand. Spread an even layer of frosting over the top, then place the second cake layer on top. Frost the top and sides of the cake, smoothing it out with a spatula for a clean finish.
For a more rustic, chalet-inspired look, you can use a fork to create a wood-grain pattern on the sides of the cake or add some chopped nuts around the base. Your Swiss Chocolate Chalet Cake is now ready to be served.
Mastering Swiss Chocolate Chalet Cake: Advanced Tips and Variations
Once you’ve mastered the basics of the Swiss Chocolate Chalet Cake, there are plenty of ways to elevate this dessert or tailor it to your preferences. Try these sophisticated pointers and variations:
Enhance the Chocolate Flavor of Swiss Chocolate Chalet Cake
To deepen the chocolate flavor, consider adding a teaspoon of instant espresso powder to the dry ingredients. In fact, espresso enhances the taste of chocolate without making the cake taste like coffee.
Add a Filling
For a more indulgent cake, add a filling between the layers. You can use chocolate ganache, whipped cream, or even a fruit preserve like raspberry or cherry for a tart contrast to the rich chocolate.
Incorporate Nuts or Fruit
Add some texture by folding chopped nuts, such as hazelnuts or almonds, into the batter. Dried fruits like cherries or apricots also make excellent additions, providing a burst of flavor in each bite.
Try Different Frostings
While a classic chocolate buttercream or ganache is always a hit, you can experiment with different frostings. A Swiss meringue buttercream offers a lighter, silkier alternative, or you could try a cream cheese frosting for a tangy twist.
Create a Swiss Chalet Design
For a true showstopper, decorate your cake to resemble a Swiss chalet. To achieve this, use chocolate shavings, pretzel sticks, or wafer cookies to create the look of a wooden chalet on top of the cake. Additionally, you can even add little snow-dusted trees made from fondant or white chocolate.
Make it Boozy
For an adult version of the Swiss Chocolate Chalet Cake, consider adding a splash of liqueur to the batter or frosting. For example, Amaretto, Grand Marnier, or even a rich dark rum pairs beautifully with chocolate.
Serving Suggestions
Serve the Swiss Chocolate Chalet Cake with a dollop of whipped cream or a scoop of vanilla ice cream. For an added touch of elegance, dust the top with powdered sugar or cocoa powder just before serving.
How to Store Swiss Chocolate Chalet Cake: Best Practices
Proper storage is key to maintaining the freshness and flavor of your Swiss Chocolate Chalet Cake. Here’s how to store it effectively:
Refrigeration
If you plan to consume the cake within a few days, you can store it in the refrigerator. To keep the cake from drying out, place it in an airtight container or carefully wrap it in plastic wrap. The cake will stay fresh for up to 4-5 days in the refrigerator. For optimal texture and taste, let the cake cool to room temperature before serving.
Freezing
For longer storage, you can freeze the Swiss Chocolate Chalet Cake. Wrap the cake layers individually in plastic wrap and then in aluminum foil to prevent freezer burn. Store them in an airtight container or a heavy-duty freezer bag. You may freeze the cake for up to three months. To thaw, place the cake in the refrigerator overnight and then bring it to room temperature before frosting and serving.
Reheating
If you prefer to enjoy your cake warm, you can gently reheat slices in the microwave for about 10-15 seconds. This will soften the frosting slightly and give the cake a fresh-baked taste.
Nutritional Value of Swiss Chocolate Chalet Cake
While the Swiss Chocolate Chalet Cake is undoubtedly a treat, it also contains some nutritional benefits, especially when made with high-quality ingredients. Here’s a breakdown of its nutritional content per serving (based on 12 servings):
- Calories: Approximately 450
- Total Fat: 25g
- Saturated Fat: 15g
- Cholesterol: 100mg
- Sodium: 200mg
- Total Carbohydrates: 50g
- Dietary Fiber: 3g
- Sugars: 30g
- Protein: 6g
- Vitamin D: 2%
- Calcium: 6%
- Iron: 15%
- Potassium: 5%
This cake is a good source of iron, thanks to the dark chocolate and cocoa powder. Iron is essential for maintaining healthy blood cells and supporting overall energy levels. Additionally, the antioxidants in dark chocolate can contribute to heart health by reducing inflammation and improving cholesterol levels.
To further boost the nutritional profile, consider using whole-grain flour and natural sweeteners. These substitutions will add fiber and reduce the glycemic impact of the cake, making it a more balanced dessert option.
FAQs: Frequently Asked Questions About Swiss Chocolate Chalet Cake
1. Can I make the Swiss Chocolate Chalet Cake ahead of time?
Yes, the Swiss Chocolate Chalet Cake can be made in advance. In fact, you can bake the cake layers up to two days ahead of time and store them in the refrigerator, tightly wrapped. Then, frost the cake on the day of serving for the best results.
2. How can I ensure my cake layers are even?
To achieve even cake layers, make sure to level the batter in the pans before baking. You can also use a kitchen scale to divide the batter evenly between the pans. If the cakes dome during baking, use a serrated knife to level them before assembling.
3. What’s the best way to melt Swiss chocolate without burning it?
The best method to melt Swiss chocolate is using a double boiler. If you’re using a microwave, do so in short intervals, stirring between each one to ensure the chocolate melts evenly without scorching.
4. Can I use milk chocolate instead of dark chocolate?
While you can use milk chocolate, it will result in a sweeter, less intense flavor. Dark chocolate is preferred for its rich, robust taste, which is the hallmark of the Swiss Chocolate Chalet Cake.
5. How can I make this cake gluten-free?
To make the Swiss Chocolate Chalet Cake gluten-free, substitute the all-purpose flour with a 1:1 gluten-free flour blend that contains a binding agent like xanthan gum. This way, the cake retains its structure and texture.
6. What frosting pairs best with this cake?
A classic chocolate buttercream or ganache pairs beautifully with the Swiss Chocolate Chalet Cake. On the other hand, for a lighter option, consider using a whipped cream frosting or a Swiss meringue buttercream.
7. Can I freeze the frosted cake?
Yes, you can freeze the frosted cake, though it’s better to freeze the cake layers separately and frost them after thawing. If freezing the frosted cake, make sure it’s well-wrapped to protect the frosting from damage.
8. How long does the cake stay fresh?
When stored properly in the refrigerator, the Swiss Chocolate Chalet Cake stays fresh for up to 5 days. If frozen, it can last up to 3 months.
