Introduction and Key Insights
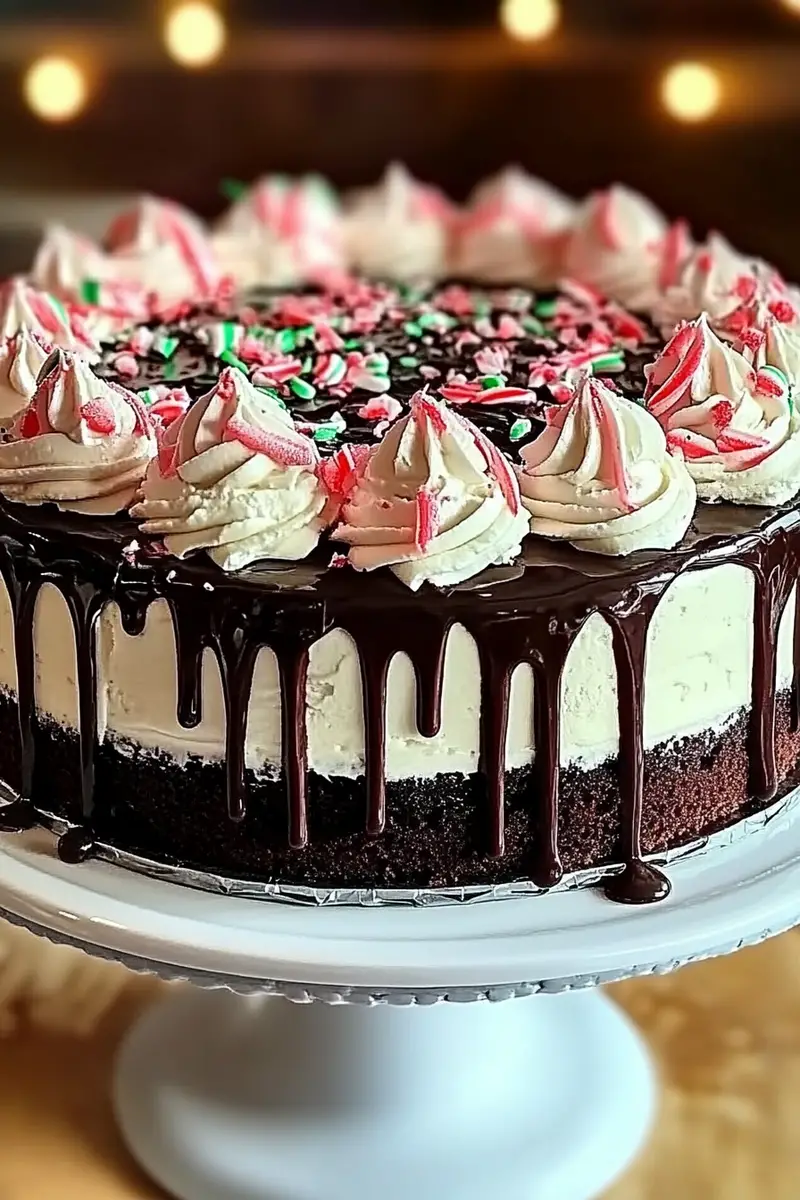
If you’re seeking a show-stopping dessert that will leave your guests raving, look no further than the Chocolate Peppermint Ice Cream Cake. Combining rich chocolate layers with cool peppermint ice cream creates a delightful contrast that makes it perfect for any celebration. This cake not only satisfies your sweet tooth but also brings festive cheer to your table. Whether it’s a birthday party, holiday gathering, or just a cozy family dinner, this recipe will elevate the occasion.

The beauty of this dessert lies in its simple yet elegant presentation. With layers of luscious chocolate cake and creamy peppermint filling, each slice is an indulgent treat. Plus, making this cake can be a fun activity with family or friends; kids especially love helping out in the kitchen when it involves ice cream. As you prepare to dive into making this delightful treat, gather your ingredients and get ready for an adventure in baking.
In this detailed guide, we’ll walk you through everything from ingredient selection to serving suggestions. By the end of this article, you’ll have all the skills needed to create your very own Chocolate Peppermint Ice Cream Cake that will impress anyone who takes a bite.
Ingredients Overview for Chocolate Peppermint Ice Cream Cake
Flour
For our cake base, you’ll need 1 ½ cups of all-purpose flour. This ingredient provides structure and helps the cake rise beautifully in the oven. Opt for unbleached flour as it gives a more natural flavor profile to your dessert.
Cocoa Powder
Using ½ cup of unsweetened cocoa powder adds depth and richness to the chocolate flavor of the cake. Choose high-quality cocoa powder for a more intense taste that complements the peppermint perfectly.
Sugar
You’ll require 1 cup of granulated sugar to sweeten your cake batter adequately. The sugar not only enhances flavor but also contributes to the moisture content and texture of the final product.
Baking Powder
Add 1 teaspoon of baking powder as a leavening agent to ensure your cake rises well during baking. This ingredient is crucial for achieving that fluffy texture we all love in cakes.
Eggs
Two large eggs are essential for binding the ingredients together while providing moisture and richness. They also help give your cake structure so it holds up beautifully when layered with ice cream.
Butter
You’ll need ½ cup (1 stick) of unsalted butter, softened at room temperature. Butter adds flavor and moisture while contributing to that crumbly texture we desire in our chocolate cake.
Milk
Use ¾ cup of whole milk for added moisture in the batter. The fat content in whole milk helps create a tender crumb while enhancing the overall richness of the chocolate flavor.
Peppermint Ice Cream
For filling between your layers and for topping, use 4 cups of peppermint ice cream. Let it soften slightly before spreading it between layers; this makes it easier to work with while creating that smooth layer effect.
Whipped Cream
Top off your finished cake with 2 cups of whipped cream. Not only does it add lightness to each slice but also provides an appealing contrast against the rich chocolate base.

How to Prepare Chocolate Peppermint Ice Cream Cake
Step One: Prepare Your Baking Pans
Begin by preheating your oven to 350°F (175°C). Grease two round 9-inch baking pans with butter or non-stick spray and line them with parchment paper for easy removal after baking. Ensure both pans are evenly greased; this helps prevent sticking during baking.
Step Two: Mix Dry Ingredients
In a medium bowl, whisk together the flour, cocoa powder, baking powder, and sugar until they’re well combined. This process ensures even distribution of all dry ingredients in your batter and prevents clumping when you mix wet ingredients later on.
Step Three: Combine Wet Ingredients
In another large bowl, beat together softened butter and eggs until creamy using an electric mixer on medium speed. Gradually add in the milk while continuing to mix until everything is well blended into a smooth mixture without lumps remaining.
Step Four: Incorporate Dry Ingredients
Slowly add the dry mixture into your wet mixture while mixing on low speed until just combined—the key here is not overmixing as this can result in dense cakes rather than light and fluffy ones.
Step Five: Bake Your Cakes
Pour equal portions of batter into each prepared pan before placing them into your preheated oven. Bake for approximately 30-35 minutes or until a toothpick inserted into the center comes out clean; let them cool completely before removing from pans.
Step Six: Layering Your Cake
Once cooled down completely (about 30 minutes), carefully remove each layer from their pans onto wire racks or plates; spread softened peppermint ice cream over one layer evenly before placing another layer on top gently pressing down slightly so they stick together nicely.
Step Seven: Frost With Whipped Cream
After layering is complete—top off with whipped cream generously covering all sides ensuring every slice has some frosting too. Feel free to decorate with crushed candy canes or chocolate shavings if desired—this adds visual appeal.

Serving and Storing Tips
Serving Suggestions
When serving your Chocolate Peppermint Ice Cream Cake consider slicing it into wedges using a sharp knife dipped in warm water for clean cuts—this technique helps prevent melting ice cream from smudging edges. Pair slices with fresh mint leaves or additional whipped cream dollops to elevate presentation further. This dessert pairs well alongside hot beverages like coffee or tea which contrast beautifully against its sweetness.
Storing Leftovers
Store any leftover pieces covered tightly either in an airtight container or wrapped securely with plastic wrap inside freezer bags depending on how long you intend keeping—ideally consume within three days if refrigerated otherwise freeze up-to two months allowing some thaw time before enjoying again later.
With these steps completed along with proper serving/storage techniques discussed above—you now have everything required creating delicious homemade Chocolate Peppermint Ice Cream Cake everyone will adore. Enjoy indulging guilt-free knowing you crafted such delightful masterpiece yourself.
Mistakes to avoid
When preparing a Chocolate Peppermint Ice Cream Cake, certain mistakes can hinder your success. First, using low-quality ingredients can significantly affect the taste and texture of your cake. Opt for high-quality chocolate and fresh peppermint extract to elevate the flavors.
Another common mistake is not allowing your ice cream to soften before assembling the cake. Softening ice cream for about 10-15 minutes at room temperature makes it easier to spread and layer. If you skip this step, you may end up with an uneven structure.
Failing to layer properly is also crucial. When stacking the layers, ensure you create an even base for each one. This will help maintain stability and prevent the cake from collapsing. Additionally, consider chilling each layer briefly before adding the next one to help set them in place.
A frequent error is overlooking the assembly time. Plan ahead and allow enough time for each layer to freeze properly before serving. If you rush through this process, the cake may not hold together well when cut.
Finally, don’t forget about garnishes. A beautiful presentation enhances the overall experience. Skimping on decorations like whipped cream or chocolate shavings can make your cake less appealing and diminish its festive spirit.

Tips and tricks
To master your Chocolate Peppermint Ice Cream Cake recipe, follow these handy tips and tricks. Start by choosing a sturdy base, such as a graham cracker or chocolate cookie crust. This will provide stability and enhance the flavor profile of your cake.
Consider using different ice cream flavors for layering; combining mint chocolate chip and vanilla will create a delightful contrast that impresses guests. Additionally, experiment with adding crushed candy canes between layers for extra crunch and festive flair.
When spreading ice cream between layers, use an offset spatula for a smooth finish. This tool helps achieve clean lines and an even distribution of flavors throughout the cake.
Chill your mixing bowls and utensils before whipping cream for toppings. Cold tools help create stable peaks in whipped cream, ensuring it holds its shape beautifully on top of your cake.
Lastly, allow ample time for freezing between steps—aim for at least 4 hours or overnight if possible. Patience pays off in dessert preparation; giving your cake time to freeze ensures it maintains its structure while serving.
Suggestions for Chocolate Peppermint Ice Cream Cake
For an enhanced Chocolate Peppermint Ice Cream Cake experience, consider layering flavors strategically. Start with a rich chocolate layer followed by peppermint ice cream; this contrast creates an unforgettable taste sensation that delights every palate.
Incorporate additional textures by adding crushed cookies or chocolate chips between layers. These elements contribute crunchiness that complements the smoothness of the ice cream while enriching overall flavor complexity.
If you want a more intense peppermint flavor, try infusing peppermint syrup into your whipped topping or frosting before applying it to the cake’s surface. This addition amplifies the refreshing taste without overpowering other components.
Decorative elements are essential too. Use fresh mint leaves or seasonal berries as garnishes around the edges of your cake plate; these touches not only enhance visual appeal but also provide bursts of freshness alongside each decadent slice.
Lastly, consider serving alongside homemade hot fudge or mint sauce as drizzles over individual pieces when plating up slices—this adds another flavor dimension while elevating presentation further.

FAQs
What is a Chocolate Peppermint Ice Cream Cake?
A Chocolate Peppermint Ice Cream Cake is a delightful dessert that combines rich chocolate cake layers with creamy peppermint ice cream. The combination creates a unique treat that’s perfect for special occasions or holiday celebrations. The layers are typically sandwiched together with softened ice cream, providing both texture and flavor variety in each slice.
How long does it take to prepare a Chocolate Peppermint Ice Cream Cake?
Preparing a Chocolate Peppermint Ice Cream Cake usually takes several hours due to freezing times required between assembly steps. While actual preparation may only take about 30 minutes to an hour, allowing adequate freezing time—typically 4 hours or overnight—is crucial for achieving optimal results before serving.
Can I use store-bought ice cream for this recipe?
Yes. Using store-bought ice cream simplifies preparation while still yielding delicious results in your Chocolate Peppermint Ice Cream Cake recipe. Opt for high-quality brands that offer rich flavors; this choice will enhance overall taste without compromising quality during assembly.
How should I store leftover Chocolate Peppermint Ice Cream Cake?
To store any leftovers from your Chocolate Peppermint Ice Cream Cake effectively, wrap individual slices tightly in plastic wrap or aluminum foil after ensuring they are fully frozen first so they retain their shape during storage. Place them in an airtight container within the freezer where they should remain fresh for up to two weeks.
Can I substitute peppermint extract with fresh mint leaves?
While fresh mint leaves add delightful aromas and flavors when used creatively within recipes like sauces or salads—they do not work as direct substitutes due to their lack of concentrated flavor found in extracts specifically designed for baking needs such as those required here.
Is it possible to make this dessert dairy-free?
Absolutely. You can create dairy-free versions by substituting regular ice creams with non-dairy alternatives made from coconut milk or almond milk bases while also exploring vegan whipped toppings available at many grocery stores today—allowing everyone access to enjoy this delicious treat.
Conclusion
In conclusion, creating a mouthwatering Chocolate Peppermint Ice Cream Cake involves careful attention to detail throughout every step—from selecting quality ingredients down through proper assembly techniques. By avoiding common pitfalls like inadequate softening times or improper layering methods while incorporating helpful tips such as using chilled tools during preparation—your dessert will shine brightly among guests.
Remember always prioritize patience by giving ample freezing time between layers; this ensures structural integrity once served up at gatherings. With these insights combined into practice along with fun suggestions around enhancing flavors & presentations—you’ll be well-equipped when crafting unforgettable moments through delightful desserts like no other.
<.-- wp:wp-tasty/tasty-recipe {"id":1272,"lastUpdated":1734886421301} /-->

