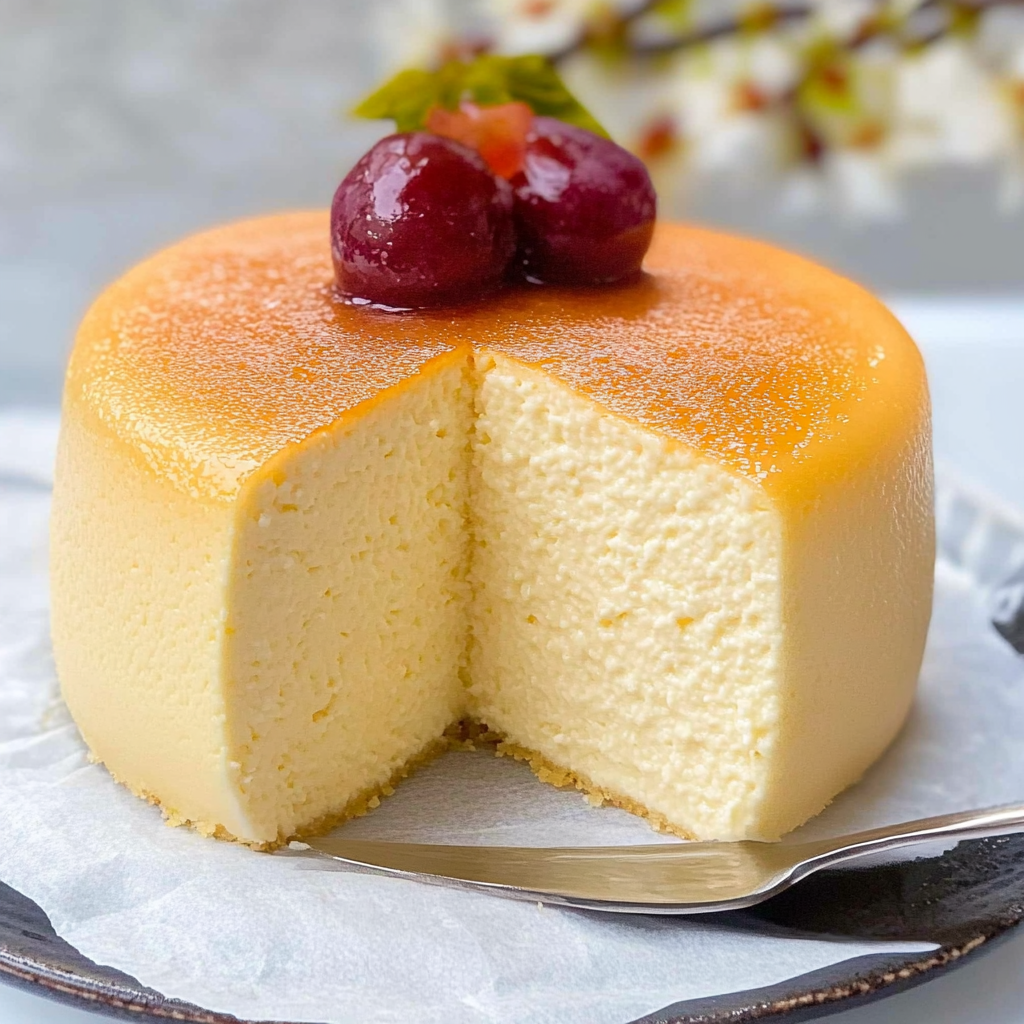
Spring Japanese Cheesecake is like a fluffy cloud that decided to land on your plate. Imagine taking a bite and feeling an explosion of delicate sweetness paired with a subtle tanginess, wrapped in the lightest texture imaginable. This dessert, often mistaken for a simple cheesecake, surprises you with its airy consistency, making it feel more like you’re indulging in a delightful soufflé rather than a traditional cake.

I remember the first time I made Spring Japanese Cheesecake for my family. We gathered around the table, excitement buzzing in the air, and as each slice was served, my brother exclaimed that it tasted like happiness Perfect for spring gatherings or any day that needs a little extra joy, this cheesecake will have everyone eagerly awaiting their next bite.
Why You'll Love This Recipe
- This Spring Japanese Cheesecake is easy to whip up, even for novice bakers
- Its light flavor profile makes it a crowd-pleaser at any gathering
- Visually stunning with its golden top and soft texture, it’s an Instagram-worthy dessert
- Versatile enough to dress up with fruits or sauces, you can tailor it to your taste preferences
One memorable moment was when my friends couldn’t get enough of the cheesecake they kept asking for seconds and thirds until there was barely a crumb left.

Essential Ingredients
Here’s what you’ll need to make this delicious dish:
- Softened Cream Cheese: Opt for full-fat cream cheese for that dreamy richness that makes every bite unforgettable.
- Granulated Sugar: Use fine sugar to ensure it dissolves perfectly into the batter without gritty surprises.
- Eggs: Fresh eggs are key they help create that fluffy texture we all love in Japanese cheesecakes.
- Milk: Whole milk brings moisture and richness no skimpy substitutes here
- Fresh Lemon Juice: A splash of lemon juice adds brightness and balances the sweetness beautifully.
- All-Purpose Flour: Sifted flour ensures there are no lumps, helping achieve that smooth batter we crave.
- Cornstarch: This secret ingredient enhances the cake’s fluffiness while providing structure.
- Baking Powder: Just a pinch of baking powder helps give our cake that lovely rise without being overly dense.
- Salt: A tiny bit of salt amplifies all those glorious flavors hiding in your ingredients.
The full ingredients list, including measurements, is provided in the recipe card directly below.
Let’s Make it Together
Preheat your oven: Preheat your oven to 320°F (160°C) while you prepare the batter. This allows for a perfect bake right from the start.
Prepare your baking pan: Line an 8-inch round cake pan with parchment paper and grease it lightly. This ensures your cheesecake slides out effortlessly after baking.
Mix cream cheese: In a large bowl, beat softened cream cheese until smooth and creamy. The goal is to eliminate lumps so you’ll have a luxuriously silky texture.
Combine eggs and sugar: Gradually add granulated sugar to the cream cheese while continuing to mix. Add eggs one at a time, blending thoroughly between additions until everything is well combined.
Incorporate dry ingredients: Gently fold in sifted flour, cornstarch, baking powder, and salt until just combined. Be careful not to overmix we want that fluffiness
Add milk and lemon juice: Slowly stir in milk and fresh lemon juice until you achieve a smooth batter. The mixture should be silky without any visible lumps.
Bake: Pour the batter into your prepared pan and place it inside a larger pan filled with hot water (this water bath prevents cracks). Bake for about 60 minutes or until golden brown on top.
Cool down: Once baked, turn off the oven but leave the cheesecake inside with the door slightly ajar for about an hour. This slow cooling process helps maintain its structure.
Chill before serving: Remove from the oven and refrigerate for at least four hours or overnight before serving. Patience pays off as it transforms into an irresistible treat
Serve with flair: Just before serving, dust with powdered sugar or top with fresh fruit if desired. Each slice will look like pure perfection ready to impress
Enjoying Spring Japanese Cheesecake is not just about indulging in dessert it’s about sharing moments filled with laughter and joy around your table
You Must Know
- Spring Japanese Cheesecake is a delightful blend of fluffy texture and delicate sweetness
- It’s lighter than traditional cheesecake, making it perfect for spring gatherings
- The aroma while baking fills the kitchen with a warm, inviting scent that makes everyone curious about what’s cooking
Perfecting the Cooking Process
Start by separating your eggs, and beat the egg whites until they form stiff peaks. While they are whisking away, combine the cream cheese mixture on low heat. This order ensures maximum fluffiness and a creamy texture.

Add Your Touch
Consider adding matcha powder for a unique flavor twist or lemon zest for brightness. Both variations can elevate your Spring Japanese Cheesecake into something spectacular and refreshing.
Storing & Reheating
Store any leftovers in an airtight container in the fridge for up to three days. To enjoy it warm again, gently reheat in the oven at 300°F for about 10 minutes.
Chef's Helpful Tips
- For a light and fluffy cheesecake, make sure your ingredients are at room temperature before mixing
- Avoid overmixing the egg whites gently fold them into the batter instead
- Lastly, let the cheesecake cool gradually to prevent cracking on top
Baking this Spring Japanese Cheesecake always reminds me of my first attempt when I had friends over. They were skeptical at first but ended up raving about how deliciously light it was

FAQ
What makes Spring Japanese Cheesecake different from regular cheesecake?
Spring Japanese Cheesecake is lighter, fluffier, and less dense than traditional cheesecakes.
Can I substitute cream cheese with something else?
Yes, mascarpone is an excellent alternative for a richer flavor in this cheesecake.
How long does it take to bake this cheesecake?
It typically takes about 60 minutes to bake at 320°F until golden brown on top.
Spring Japanese Cheesecake
Spring Japanese Cheesecake is a light and airy dessert that feels like a fluffy cloud on your plate. With its delicate sweetness and subtle tanginess, this cheesecake offers a delightful experience reminiscent of a soufflé. Perfect for spring gatherings or any occasion that calls for joy, this visually stunning treat will have everyone eager for seconds.
- Prep Time: 20 minutes
- Cook Time: 60 minutes
- Total Time: 1 hour 20 minutes
- Yield: Serves approximately 12 slices 1x
- Category: Dessert
- Method: Baking
- Cuisine: Japanese
Ingredients
- 8 oz softened cream cheese
- 3/4 cup granulated sugar
- 4 large eggs
- 1/4 cup whole milk
- 2 tbsp fresh lemon juice
- 1/2 cup sifted all-purpose flour
- 2 tbsp cornstarch
- 1 tsp baking powder
- 1/4 tsp salt
Instructions
- Preheat the oven to 320°F (160°C) and line an 8-inch round cake pan with parchment paper.
- In a bowl, beat softened cream cheese until smooth. Gradually add sugar, mixing well.
- Add eggs one at a time, blending thoroughly after each addition.
- Gently fold in sifted flour, cornstarch, baking powder, and salt.
- Stir in milk and lemon juice until smooth.
- Pour batter into the prepared pan placed inside a larger pan filled with hot water. Bake for about 60 minutes or until golden brown.
- Cool slowly in the oven with the door ajar for an hour, then refrigerate for at least four hours before serving.
Nutrition
- Serving Size: 1 slice (85g)
- Calories: 162
- Sugar: 10g
- Sodium: 154mg
- Fat: 9g
- Saturated Fat: 5g
- Unsaturated Fat: 3g
- Trans Fat: 0g
- Carbohydrates: 16g
- Fiber: 0g
- Protein: 4g
- Cholesterol: 109mg
Keywords: For added flavor variations, consider incorporating matcha powder or lemon zest into the batter. Store leftovers in an airtight container in the fridge for up to three days.


