
Have you ever wondered, “What are red velvet brownies made of?” Red velvet brownies are an irresistible fusion of two beloved desserts: red velvet cake and classic brownies. Known for their striking red color, subtle cocoa flavor, and rich, fudgy texture, these treats have taken the dessert world by storm. Whether you’re a novice baker, an experienced home cook, or someone looking for a simple yet decadent dessert, red velvet brownies are the perfect choice.
In this detailed guide, we’ll not only answer what red velvet brownies are made of, but also take you through the entire process of making them, from selecting the right ingredients to perfecting their texture. We’ll explore the health benefits, variations for dietary preferences, advanced tips, storage methods, and answer common questions you may have about these delectable treats.
Introduction to What Are Red Velvet Brownies Made Of
If you’re new to the world of baking, you might be curious: what exactly are these brownies made of? They are primarily a combination of simple ingredients like butter, sugar, eggs, cocoa powder, flour, and food coloring. What sets them apart from traditional brownies is their vibrant red color and the addition of buttermilk or vinegar, which lends them the slightly tangy flavor characteristic of red velvet cake.
While regular brownies are dense and rich with a strong chocolate flavor, this version offers a more nuanced taste with a subtle cocoa essence. They’re often less sweet than other brownies, making them the perfect balance of indulgent and light.
One of the most attractive things about these treats is how versatile they are. You can dress them up with cream cheese frosting for an extra layer of flavor or enjoy them plain for a simple treat. They’re also adaptable to a variety of diets, which we’ll cover later in this guide.
Whether you’re a busy professional looking for a quick dessert, a parent who wants to surprise your family with something special, or a student seeking an easy recipe for a study break snack, these brownies are ideal. Let’s dive deeper into the benefits and advantages of making them.
Benefits and Advantages of Red Velvet Brownies
So, what makes red velvet brownies such a fantastic choice for dessert? While their appearance is undoubtedly eye-catching, there’s much more to these treats than just their vibrant color. Below, we’ll explore the various benefits and advantages of making red velvet brownies.
1. Simple and Easy to Make
One of the greatest advantages of red velvet brownies is their simplicity. With just a handful of pantry staples, you can create a beautiful and delicious dessert in less than an hour. Unlike more elaborate desserts like cakes that require multiple layers and decorations, brownies are straightforward and relatively quick to prepare. Red velvet brownies take that simplicity and add a bit of flair with their bright color and distinctive flavor profile.
Even if you’re new to baking, you can confidently whip up a batch of red velvet brownies. The ingredients are easy to find, and the steps are easy to follow, making this recipe accessible to beginners and experienced bakers alike.
2. A Unique Flavor Profile
These brownies have a flavor profile that sets them apart from other desserts. While traditional brownies are all about rich, intense chocolate, this version offers a more delicate cocoa flavor, balanced by the slight tang from the vinegar or buttermilk. This gives them a unique taste that’s both rich and refreshing.
The combination of cocoa and vanilla creates a subtle, yet distinctive flavor that’s not too sweet or overpowering, making these treats a crowd-pleaser for those who love chocolate but want something a little different. It’s this complexity in flavor that makes them so special.
3. Versatile for Different Occasions
Whether you’re hosting a party, attending a potluck, or looking for a festive treat, red velvet brownies are perfect for a variety of occasions. Their bold red color makes them an ideal dessert for holidays like Valentine’s Day, Christmas, or even the Fourth of July. You can easily add a touch of elegance by topping them with cream cheese frosting, powdered sugar, or even a drizzle of melted chocolate.
Red velvet brownies also make great gifts. Package them in a decorative box for a thoughtful homemade present, or bring them to a gathering as a sweet contribution that’s sure to impress.
4. Customizable for Different Dietary Needs
Another significant advantage of red velvet brownies is how easily they can be customized to suit different dietary preferences. Whether you’re following a gluten-free, vegan, or low-sugar diet, it’s easy to make substitutions without sacrificing flavor or texture. For example, you can replace regular flour with a gluten-free alternative, or use plant-based ingredients to make the recipe vegan-friendly.
This adaptability makes red velvet brownies an excellent option for anyone with dietary restrictions or preferences, ensuring that everyone can enjoy them without worry.
5. A Balanced Indulgence
Red velvet brownies strike a perfect balance between indulgence and restraint. They’re rich enough to satisfy a sweet craving, but not so heavy that you feel weighed down after eating one. With their light texture and moderate sweetness, they offer the perfect compromise between the richness of a brownie and the lightness of a cake.
Additionally, because red velvet brownies tend to be less sugary than traditional brownies, they’re a great option for those who want to enjoy a sweet treat without the sugar overload.
6. Opportunity for Creativity
If you’re someone who loves to experiment in the kitchen, red velvet brownies offer plenty of opportunities to get creative. Whether you want to add mix-ins like chocolate chips, nuts, or fruit, or try new variations like red velvet brownie cupcakes or blondies, the possibilities are endless. You can also play around with the presentation, topping them with sprinkles, whipped cream, or edible flowers to make them truly your own.
Ingredients Overview
Now that we’ve covered the benefits of these brownies, let’s take a closer look at the ingredients that make them so delicious. As you might expect, many of the components are similar to those found in traditional brownies, with a few key additions that give them their unique flavor and appearance.
Essential Ingredients for Red Velvet Brownies
Here’s a breakdown of the essential ingredients for red velvet brownies and how each one contributes to the final product:
<.-- wp:list {"ordered":true} -->
- All-Purpose Flour: Flour is the foundation of the brownies, providing structure and texture. You can substitute all-purpose flour with a gluten-free baking blend if necessary.
- Unsweetened Cocoa Powder: While red velvet recipes don’t use as much cocoa as regular brownies, the cocoa powder adds a subtle chocolate flavor that’s integral to the taste.
- Granulated Sugar: Sugar sweetens the brownies and helps achieve the perfect fudgy texture.
- Unsalted Butter: Butter adds richness and moisture, giving the brownies a smooth and velvety texture. For a dairy-free option, you can substitute butter with margarine or coconut oil.
- Eggs: Eggs act as a binding agent, holding the ingredients together and ensuring a soft, chewy texture. Vegan bakers can use flax eggs as an alternative (1 tablespoon ground flaxseed mixed with 3 tablespoons water = 1 egg).
- Red Food Coloring: This is what gives red velvet brownies their signature red hue. Liquid or gel food coloring both work well, though gel tends to give a more vibrant color with less quantity.
- Vanilla Extract: Vanilla enhances the overall flavor, adding warmth and depth to the brownies.
- Vinegar: A small amount of vinegar helps react with the baking soda to create a light, tender texture while also giving red velvet its characteristic tangy flavor.
- Buttermilk: Traditional red velvet recipes often use buttermilk, adding a slight tang and contributing to the cake-like texture of the brownies. To make a buttermilk substitute, combine regular milk with a teaspoon of vinegar or lemon juice and let it sit for a few minutes.
- Baking Powder: Baking powder helps the brownies rise and ensures a light, airy texture.
- Salt: Salt balances the sweetness and enhances the flavors of the cocoa and vanilla.
Dietary Substitutions to Customize Your Red Velvet Brownies
One of the best things about red velvet brownies is how easy they are to adapt to different dietary needs. Here are a few substitutions you can make to customize the recipe:
- Gluten-Free: Use a 1:1 gluten-free baking blend in place of regular flour. Most gluten-free flours perform similarly in brownie recipes, so you shouldn’t notice much difference in taste or texture.
- Vegan: Replace the eggs with flax or chia eggs, and use a plant-based butter or coconut oil in place of dairy butter. For buttermilk, mix your favorite plant-based milk (like almond, soy, or oat milk) with a teaspoon of vinegar or lemon juice to mimic the tang of traditional buttermilk.
- Low-Sugar: You can reduce the sugar content by using a sugar substitute like Stevia, Erythritol, or monk fruit sweetener. Keep in mind that the texture may change slightly, but the taste will remain delicious.
- Dairy-Free: Use dairy-free butter or coconut oil, and replace the buttermilk with a non-dairy alternative mixed with vinegar or lemon juice.
How to Prepare the Perfect Red Velvet Brownies: Step-by-Step Guide
Now that you know what these brownies are made of, it’s time to put that knowledge into action. Follow this step-by-step guide to bake a batch of perfectly chewy, fudgy treats.
First Step: Preheat the Oven
Preheat your oven to 350°F (175°C). Line an 8×8-inch or 9×9-inch baking dish with parchment paper, or grease it well to prevent the brownies from sticking.
Second Step: Combine the Dry Ingredients
In a medium-sized mixing bowl, whisk together 1 cup of all-purpose flour, 2 tablespoons of unsweetened cocoa powder, ½ teaspoon of baking powder, and ¼ teaspoon of salt. Set the dry mixture aside for later.
Third Step: Melt the Butter and Sugar
In a large microwave-safe bowl, melt ½ cup of unsalted butter. Once melted, stir in 1 cup of granulated sugar until fully combined. This step helps achieve that glossy, crackly top that every brownie lover dreams of.
Fourth Step: Mix the Wet Ingredients
Add 2 large eggs to the butter and sugar mixture, and beat until smooth. Stir in 1 teaspoon of vanilla extract, 1 tablespoon of red food coloring, and 1 teaspoon of white vinegar. Then, mix in ¼ cup of buttermilk. If you’re making a vegan version, use flax eggs and plant-based buttermilk (non-dairy milk + vinegar).
Fifth Step: Combine the Wet and Dry Ingredients
Slowly mix the dry ingredients into the wet ingredients, stirring until just combined. Take caution not to overmix because the result will be rough, dense brownies.
Sixth Step: Bake the Brownies
Pour the batter into the prepared baking dish, using a spatula to spread it evenly. Insert a toothpick into the center after baking for 20-25 minutes; it should come out with a few moist crumbs. Keep an eye on them towards the end of the baking time to avoid overbaking.
Seventh Step: Cool and Serve
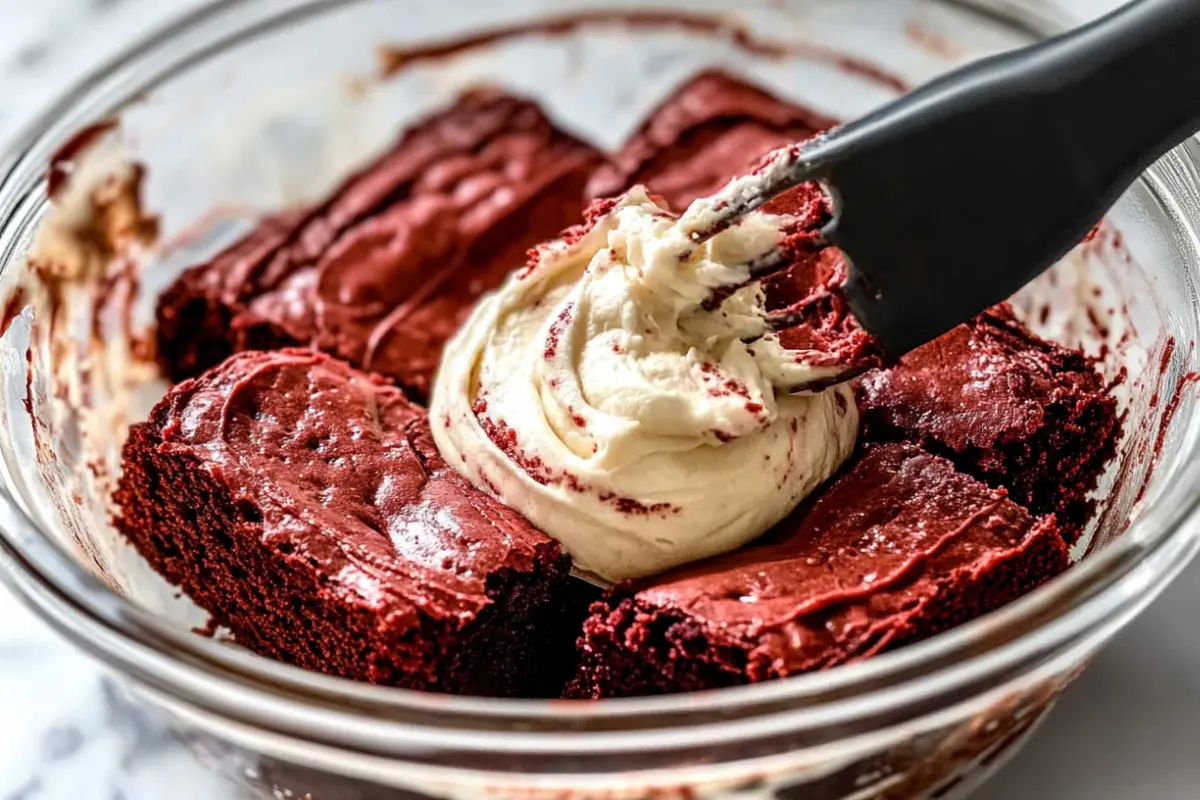
Let the brownies cool fully in the pan before slicing them into squares. For an extra touch, you can dust them with powdered sugar, top with cream cheese frosting, or drizzle with melted white chocolate.
Mastering Red Velvet Brownies: Advanced Tips and Variations
If you want to take your red velvet brownies to the next level, here are a few advanced tips and variations to consider:
- Add a Cream Cheese Swirl: For a decadent twist, mix up a cream cheese filling (4 oz cream cheese, ¼ cup sugar, and 1 egg yolk) and swirl it into the brownie batter before baking.
- Mix-Ins: Stir in chocolate chips, white chocolate chips, or chopped nuts for added texture and flavor.
- Natural Food Coloring: If you prefer to avoid artificial dyes, you can achieve a red hue using beet powder or pureed beets. While the color might not be as vibrant, the flavor remains delicious.
- Red Velvet Blondies: Skip the cocoa powder and food coloring for a blondie version that’s rich in vanilla flavor.
- Red Velvet Brownie Cupcakes: Pour the batter into a lined muffin tin to make individual servings. Adjust the baking time to 15-18 minutes, or until the tops spring back lightly when touched.
How to Store Red Velvet Brownies: Best Practices
Storing red velvet brownies properly ensures they stay fresh and delicious for as long as possible. Here’s how to store them:
Room Temperature Storage
If you plan to eat the brownies within a few days, store them at room temperature in an airtight container. They should stay fresh for up to 3 days. Make sure they’ve cooled completely before storing them, as warm brownies can create condensation, leading to soggy brownies.
Refrigeration
If you prefer your brownies chilled, store them in the refrigerator. They will last up to a week when stored in an airtight container. The cold temperature gives the brownies an even denser texture, which some people prefer.
Freezing
To freeze red velvet brownies, wrap them individually in plastic wrap, then place them in a freezer-safe container or zip-top bag. They can be frozen for up to 3 months. When you’re ready to enjoy one, simply thaw it at room temperature, or pop it in the microwave for a few seconds for a warm treat.
Nutritional Value of Red Velvet Brownies
The nutritional value of red velvet brownies can vary depending on the ingredients used and the portion size. Below is a general breakdown of the nutritional content for a typical serving (one brownie):
- Calories: 200-250
- Fat: 10-12 grams
- Carbohydrates: 28-30 grams
- Protein: 3-4 grams
- Sugar: 18-22 grams
If you make dietary modifications (such as using low-sugar sweeteners or plant-based ingredients), these values may change slightly. Regardless of the version you make, red velvet brownies offer a balanced treat that’s indulgent without being overly heavy.
FAQs: Frequently Asked Questions About Red Velvet Brownies
1. Can I make red velvet brownies without food coloring?
Yes. If you prefer not to use food coloring, you can simply leave it out. The brownies will be a natural chocolate color instead of red, but they’ll still taste delicious.
2. Can I use a boxed brownie mix to make red velvet brownies?
You can use a boxed mix for a quick option; however, making red velvet brownies from scratch gives better flavor and texture. If using a mix, add red food coloring and a bit of buttermilk or vinegar for a red velvet touch.
3. How can I make my red velvet brownies fudgier?
For extra fudgy brownies, try using a bit less flour or adding an extra egg yolk. Additionally, you can slightly underbake them for a gooey, dense texture.
4. What’s the best way to cut brownies cleanly?
To cut brownies cleanly, allow them to cool completely. You can also refrigerate them for about 30 minutes before cutting. Use a sharp knife, and wipe the blade clean between each cut for the best results.
5. Can I freeze red velvet brownies?
Absolutely. Red velvet brownies freeze well. Simply wrap each brownie individually in plastic wrap, and then store them in a freezer-safe container. Additionally, they’ll keep for up to 3 months.
